ブログトップ
SOY Shopプラグインの解説 ユーザカスタムフィールド2
2014年03月01日
前回のユーザカスタムフィールドのフォームの出力の話をしました。
今回はそのフォームから送信されたPOSTの処理についてを見ていきたいと思います。
SOY Shopプラグインの解説 ユーザカスタムフィールド1
フォームから送信されたPOSTは、
soyshop.user.customfield.phpのdoPost関数で処理されます。
(ディフォルトではCart02のお客様情報の入力の後のCart03ページへの遷移)
フォームが出力された際のHTMLは
<input type="text" name="user_customfield[フィールドID]" value="">
になるので、
doPost関数では、$_POST["user_customfield"][フィールドID]の値を、
MyPageLogicのsetAttributeにkey-valueの形で保存します。
/soyshop/webapp/src/module/plugins/common_user_customfield/soyshop.user.customfield.php
function doPost($param){

	$this->prepare();
	$mypage = $this->getMypage();

	//途中省略、POSTの値を取得して、必要に応じて処理を行う。

	//keyを作成
	$attributeKey = self::getAttributeKey($key);

	//MyPageLogicのセッションに値を放り込む
	$mypage->setAttribute($attributeKey, $obj["value"]);
}
このようにMyPageLogicで作成したセッションに値を保存して他ページへ遷移します。
doPostでセッションに入れた値を、入力確認ページで表示するために、
confirm、もしくはbuildNamedFormを使います。
confirm関数は前回のgetForm同様
function confirm($mypage){
	//出力する内容を格納する
	$return = array();

	$this->prepare();

	foreach($this->list as $config){

		$return[$config->getFieldId()] = $obj;
	}

	return $return;
}
配列にフィールドIDと内容を放り込んで返す。
カートページの入力内容確認のところに
<!-- soy:id="has_user_customfield" -->
<!-- soy:id="user_customfield_list" -->
<tr>
	<th nowrap scope="row"><!-- soy:id="customfield_name" /--></th>
	<td>
		<!-- soy:id="customfield_confirm" /-->
	</td>
</tr>
<!-- /soy:id="user_customfield_list" -->
<!-- /soy:id="has_user_customfield" -->
と書けば、
確認画面に要素の分だけ文字列が出力されます。
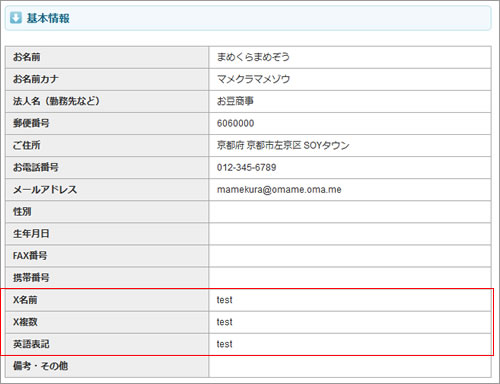
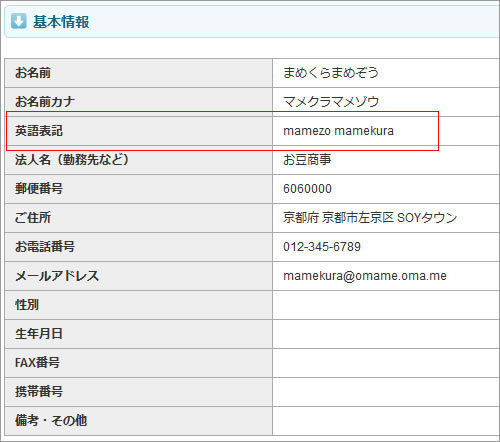
もう一つのパターンは前回の英語表記の例のように
名前の下にカスタムフィールドを出力したいという場合です。
これは前回にも記載しましたが、
buildNamedFormで$page->addInput("****", array());とすることで
<input type="text" soy:id="user_customfield_english">を作成すると同時に、
<!-- soy:id="user_customfield_english_text" /-->も追加されますので、
後者のタグを確認画面に追加します。
このように好きな箇所に入力内容の確認のエリアを追加することができます。